How to Use Bracketing in Your Photography
Many people consider bracketing to be an option for advanced photographers only. However, it can be a tool that anyone can make use of in order to create the perfect image. It is not hard to learn how to bracket an image, and once you start using this tool, you will likely find yourself turning to it over and over again.
Would you like to learn more about bracketing and what it can do for your photography?
Just what is Bracketing?
If you have never heard of bracketing before, then your first question may simply be, what is it? This tool gives you more control over the exposure of your image. It actually makes use of three different images of the same subject. In essence, you will take one image at the exposure that you think is correct, an image a step below that exposure and an image a step above that exposure. In this method, you will have a much better chance at getting the absolutely perfect image.
How do you use bracketing? Different cameras have different control options, so you will need to learn about each of them in order to determine which you will need to use with your own digital photography.
How do you use bracketing? Different cameras have different control options, so you will need to learn about each of them in order to determine which you will need to use with your own digital photography.
The Type of Bracketing
There are different types of bracketing and not all cameras will allow for every single one of them. You will need to learn which of them will be correct for your camera and your digital photography. There are three main types of bracketing that digital SLR cameras will allow:
Exposure Only
Flash Exposure Only
White Balance Only
Flash Exposure Only
White Balance Only
Some cameras will have different options. For example, the Nikon brand includes something called Active D Lighting feature and Nikon cameras will allow you to bracket this for more detail in the shadows and highlights.
In order to learn how to use bracketing, you will need to experiment with these different types. Flash bracketing can be useful when photographing close subjects so that you can make sure you get an image that is not washed out or too dark. Exposure or white balance bracketing can be useful with all types of images so that you can get the best color, the best contrast and the overall best image.
Bracketing Step By Step
Now that you have a better understanding of how bracketing works, you must be wondering how to put it into action. For a while, you may find bracketing to be a little confusing or overwhelming. However, the more that you use it, the more familiar you will become with it. Once you are completely familiar with bracketing, you will be ready to use it in almost any image that you take. Here are the steps that you will need to take in order to put bracketing to use.
1. Choose the type of bracketing. As mentioned, you may have choices for your digital photography depending on your camera.
2. Choose the number of bracketed exposures that you want. Different cameras give you different choices on this. The Canon brand will give you simply the option of the most popular bracketing of three images. The Nikon brand and some other brands will give you the ability to choose many different bracketing options, including anywhere from 2 frames to 9 frames.
3. Choose the increments for bracketing. If you are trying to fine tune an image, you will want to select a very small bracketing increment. If you want a wide range of choices, then you will want to choose a bracketing increment that is much higher. For minor adjustments, consider choosing 1/3 stop. For major adjustments, you could choose bracketing up to 1 stop. Different cameras will allow for different bracketing increments as well.
4. If you have a Canon DSLR, then you will have the option to set the zero point. This means that your camera will create an image with absolutely the best automatic exposure based on the camera’s own metering system. The zero point will be the image of which all the other images will bracket around.
5. Taking the picture. You have two different choices for taking the picture. You can take the picture in single shot mode. When you do this, you will need to press the shutter release for all of the bracketing images. If you do not want to do this, then you could choose to change your camera to burst shot mode. When you do this, you will be able to hold down the shutter release and take all of the bracketed images in one burst.
6. Reset your camera. When you are done with the bracketing image, you still need to take one more step. That would be to turn bracketing off. Your camera will not turn off the mode automatically and you could end up ruining future images.
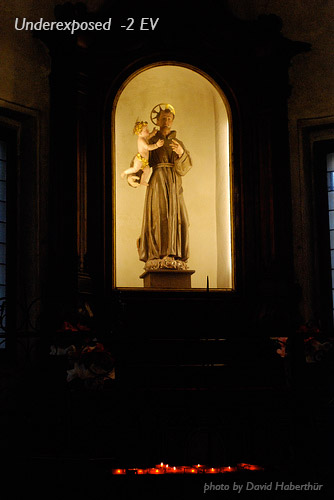
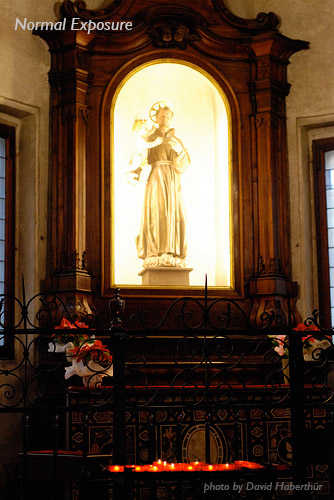
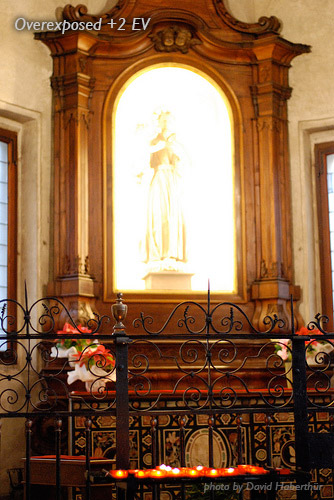
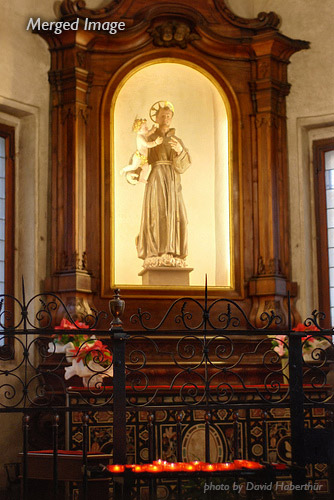
\Using Bracketing with HDR
As mentioned in another article, your camera will have something called HDR, which is a great help to digital photography. HDR stands for high dynamic range and it simply means that your camera sensors will have a greater range of exposure for even more fine tuned images. In order to make use of bracketing with HDR, you will need a photo editing software like Adobe Photoshop. With this method of bracketing, you will make use of your camera’s full exposure range in order to take several pictures. You will then import the image into the editing software and use the software’s tool to merge. This tool will be called Merge to HDR in Photoshop.
Why would you want to do this? Have you ever noticed that in certain situations, part of the image will be very dark or very light no matter what you do? You can use this type of bracketing to get the right exposure on the light parts and then the right exposure on the dark parts. By combining the two, you will be able to create the perfectly exposed image overall.
Bracketing can truly be a powerful tool once you know how to use it. You will find that you can get better images and better exposures for those images on a regular basis.
Top image by Mike Baird
No comments:
Post a Comment