Showing posts with label by The Photo Argus. Show all posts

Thursday, December 13, 2012

Four Simple Ways to Improve Your Landscape Photos in Photoshop


Four Simple Ways to Improve Your Landscape Photos in Photoshop


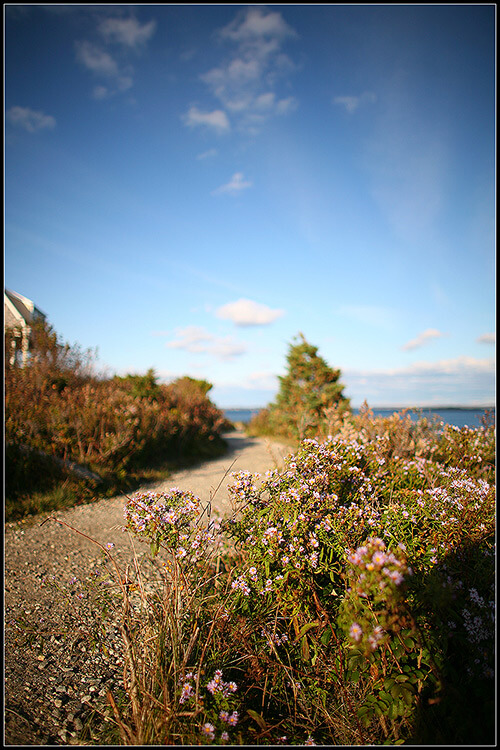
All true landscape photographers take pride in their work, and that pride usually comes from hours of Photoshop editing. While there are numerous guides, tricks, and hints you can follow to edit your landscape photos beautifully, most take some time and dedication to perfect. Before you delve into the unforeseen, and sometimes complicated, world of Photoshop editing, consider the following simple techniques that are the foundation of impressive landscape photographs.
Improve Your Landscape Photos in Photoshop

1. Straighten Your Horizon

Presenting the most stunning photo of a sunset on the Venice canal won’t mean much if your horizon is crooked; it’s quite off-putting. To easily correct this in Photoshop, open your image and click View > Show > Grid to bring up some grid lines that you can use to guide your horizon line. With your transform tool (CTRL + T), rotate the image until your horizon is lined up correctly (Figure 1). To finish, crop out the uneven edges and press CTRL + H to put the grid away.
Improve Your Landscape Photos in Photoshop

2. Make Your Horizon Off-Center

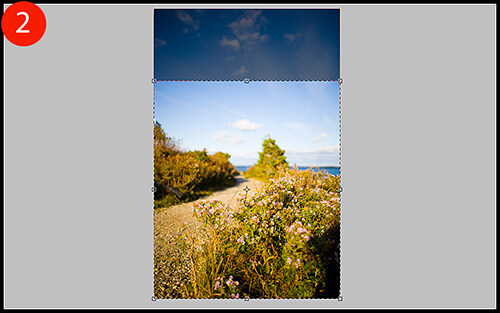
To be ascetically pleasing, a horizon that is not centered is much more intriguing to the eye and should be utilized whenever possible. In the example image, the horizon – although now straight – is too close to the center of the image. To rectify this, I am going to use my crop tool (keyboard shortcut: C) and eliminate at least half of the sky so that the balance of the photo is on the bottom, not the top (Figure 2).
Improve Your Landscape Photos in Photoshop

3. Rule of Thirds

When looking at a photo, there are certain guidelines to follow composition-wise. One guide is called the “rule of thirds”, where you should visualize your photo as having two vertical and horizontal lines dividing the photo into thirds (imagine a tic-tac-toe board). The horizon (or other important line in your photo) should be along one of the horizontal lines, while other focal points should either lie along any of the lines or the point where they intersect (Figure 3). This creates an image that is more visually stimulating to the eye and allows it to wander across the whole image. If your photo has a focal point planted in the center of the frame, then the eyes will be drawn directly to the center and may not see a need to explore the other elements in your composition.
Improve Your Landscape Photos in Photoshop
While ideally you should apply this rule out in the field rather than in post process, us photographers do not always have the time – or patience – to consider this, and rely on programs like Photoshop to line our images up correctly.
Looking at Figure 3, you can see that in the example image a major focal point (the tree in the top-right circle) is lined up perfectly with one of the intersection points. However, the horizon seems to be a bit low under the top horizontal line. To correct this, I’m going to crop out a bit more sky, and also crop out that distracting shadow in the bottom right-hand corner of the image.

4. Photo Filters

Film photographers – and some digital ones as well – use photo filters when out in the field to cast special coloring effects over their images. Warming filters will cast a slight orange/yellow hue to your image, while cooling filters will give your photo a blue hue. These are just a small sample of countless other filters you can use to add special effects to your photos. In Photoshop, however, you can easily add these effects with little effort.
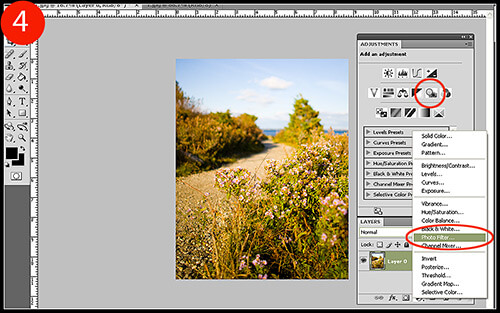
To add a Photo Filter adjustment layer to your image, click on the “new adjustment layer” icon on your layers palette toolbar, or simply click on the appropriate icon on your adjustment palette (Figure 4).
Improve Your Landscape Photos in Photoshop
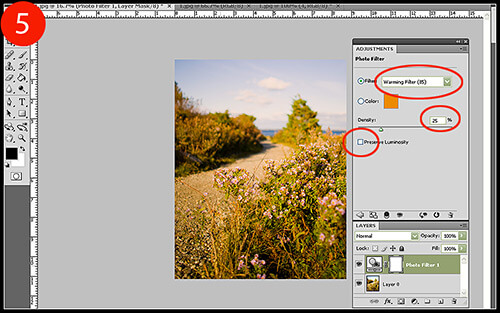
5. While the example image is coming together nicely, the blue sky could use a nice warming filter. I chose “Warming Filter (85)” as my filter choice and set the Density to 25 (Figure 5). I deselected the “preserve luminosity” box since the warming filter was starting to create some blown highlights.
Improve Your Landscape Photos in Photoshop
When compared to our original image, the improvement is quite apparent.
Improve Your Landscape Photos in Photoshop
While this image isn’t even close to being at the end of my editing process, it has benefited greatly from a few simple visual enhancements that only took a total of ten minutes to complete. If you incorporate this tutorial into your workflow, it will provide your landscape images with a very solid foundation to begin applying your editing techniques to.
How to Turn Your Favorite Photo into a Miniature Masterpiece


How to Turn Your Favorite Photo into a Miniature Masterpiece

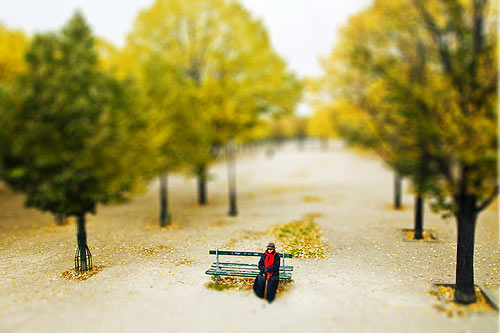
After looking at all the amazing tilt-shift images from our previous post, I’m sure you are ready to create some of your own. It’s really very simple to do. It can be accomplished in just a few easy steps. I am using Photoshop to create this tutorial but I’m sure it can be adapted for other photo applications. Lets get started.
First you want to select a photo that will work for this technique. You want to use a photo that has the perspective of looking down on the subject matter. This will make the effect more believable.
Here is an image I will be working with from Dr. Antonio Comia via Flickr. Please check out other images from this talented photographer.
Original Image
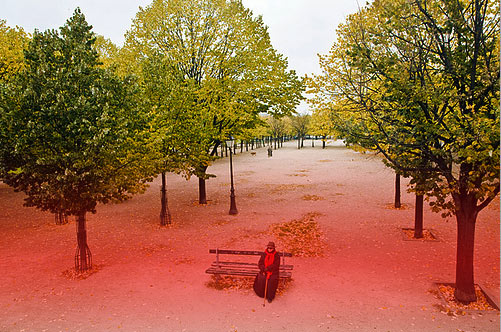
Ok, lets get started. First open up your image in Photoshop. Once open, select the Quick Mask Mode from your toolbar or hit Q.
Toolbar Image 1
Next, with the Quick Mask Mode selected click on the Gradient Tool or hit G.
Toolbar Image 2
Select the Reflected Gradient Button and make sure your gradient runs from black to white as shown.
mode and gradient image
Draw a vertical line from the center of the area you want in focus to the point where you want the blur to start. It will probably take a few times to get it the way you want.
mask image
Next step is to go back into Standard Mask Mode by clicking the Quick Mask Mode again or hitting Q. Note: These are instructions for Photoshop CS4. CS3 has a separate button for Standard Mask Mode.
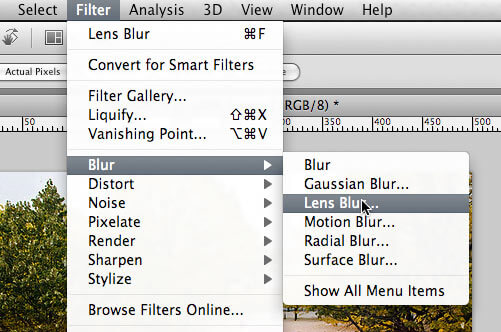
Once in Standard Mask Mode we are going to apply a Lens Blur to the image. Go to Filter>Blur>Lens Blur.
filter path image
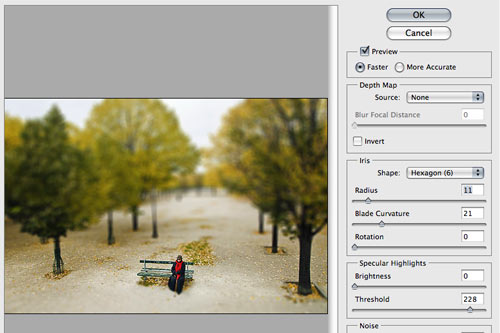
Now it’s time to experiment with the Lens Blur setting to get what you want. When you are satisfied hit OK.
Lens Blur Dialog image
To take it a step further and give your image more of a plastic look, play around with the saturation and contrast of the image. Here is my final image after some tweaking to the saturation and contrast.
Final image
That was easy wasn’t it! Just a few steps for a very cool effect. Have fun making your own miniature scenes!

Master Realistic Eye Editing in Photoshop


Master Realistic Eye Editing in Photoshop


Whether your model has that early-morning blur to their eyes or your shooting conditions were less than optimal, almost every portrait could benefit from bit of Photoshop eye assistance. By following these steps, you can achieve clear, vibrant, and piercing eyes all within fifteen minutes of post process work.
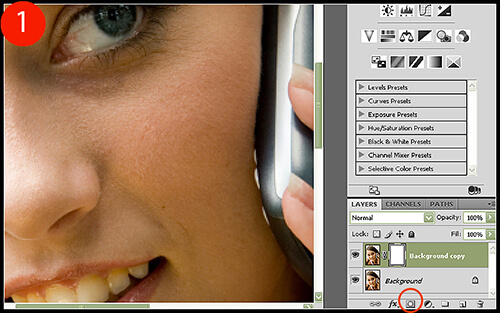
1. Click Layers > Duplicate Layer, then apply a layer mask by clicking on the icon on your layers palette toolbar (Figure 1). Select the Clone Stamp tool, and with a steady hand, clone out any unwanted or distracting reflections (unless you think they add to the portrait in some way). You may need to increase the brush hardness of your clone stamp (right-clicking on the photo will bring up the appropriate menu) when working along sharper edges, such as the pupil or the eyelids. It would also be good to clone out any redness in the whites of the eyes as well.
Eye Editing in Photoshop
The layer mask is useful in case you over-do it with your cloning: for example, if you clone with too soft of a brush on the whites of the eyes and need to mask in the eyelids a bit.
2. When finished, if you did not use your layer mask, just delete it by right-clicking the mask and selecting Delete Layer Mask.
If you did use it, then you will need to merge down a layer so that our new effects will be applied to a layer with 100% uniform transparency. To do this, click on your base layer and duplicate it. The duplicate layer should appear right beneath the top layer (the one you just masked). Now right-click on the top layer and select Merge Down to combine both layers into one.
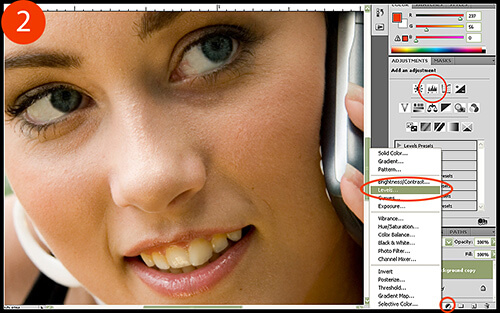
3. Let’s create a new level adjustment layer by clicking on the Levels icon in your Adjustment palette (Figure 2). Alternatively, you can select a Level Adjustment layer from the layers palette toolbar.
Eye Editing in Photoshop
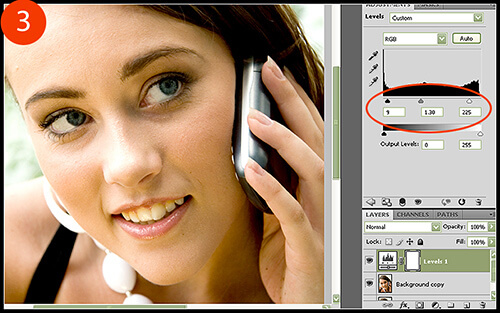
In the Adjustment palette, slide your levels around to lighten the white colors and darken the darker ones. Usually, you will only want to increase the black point triangle by very little since the outlines of the eyelids as well as the pupils are already very dark. However, the white point triangle should be adjusted rather liberally, and the midtone point slider pushed slightly whiter by sliding it to the left. For this example, the black point was reset to 9, midpoint reset to 1.30, and the white point to 225 (Figure 3).
Eye Editing in Photoshop
Do not care about what this adjustment does to the entire photo, just focus on the eyes. We will be masking out the level effect on the entire image shortly.
4. Click on the layer mask for the level adjustment layer that was automatically added and delete it by right-clicking and selecting Delete Layer Mask. You can also delete it quickly by clicking on the layer mask and drag-and-dropping it into the trash can located on your layers palette toolbar.
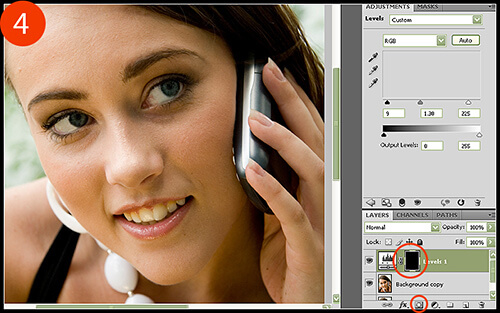
While holding down the ALT key, click on the Add Layer Mask button on your layers palette toolbar to add a black layer mask, which will hide the effect and allow us to only mask in what we choose (Figure 4).
Eye Editing in Photoshop
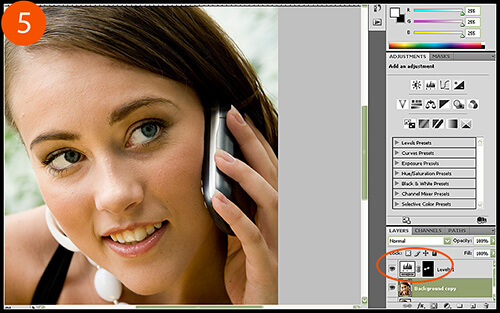
5. Click on your brush tool and set your opacity to 40% and the Master Diameter large enough to cover the entire eye. Make sure your hardness is set to 0% so that we have a very soft brush. In one circular motion, mask in the entire eye AND the entire area around the eye (about one brush width outwards from the eyelids) so that we eliminate some unwanted shadows. With the same brush, this time mask only the eye and eyelids, and finally with a smaller brush, mask just the inner eye area. Our goal is to create a gradual and flattering brightening effect around the eye that increases in intensity as you move towards to the pupil area. The finished result should look something similar to Figure 5.
Eye Editing in Photoshop
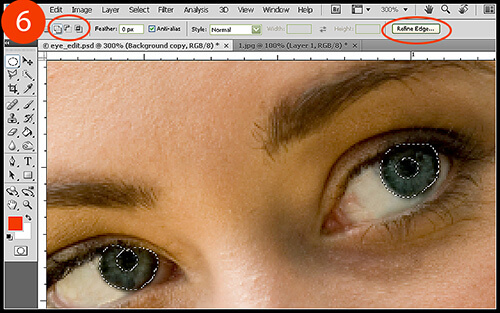
6. To finish, we are going to liven up the eye color a bit. Click on your base layer (the first layer under the adjustment layer) and then select your Oval Marquee tool, making sure the “add to selection” option is selected from the top toolbar (Figure 6). Select the entire iris area, adding to the small circles you create so that the selection is accurate. When finished, switch to the “subtract from selection” option, located just to the right of the “add to selection” option, and subtract the dark pupil area.
Eye Editing in Photoshop
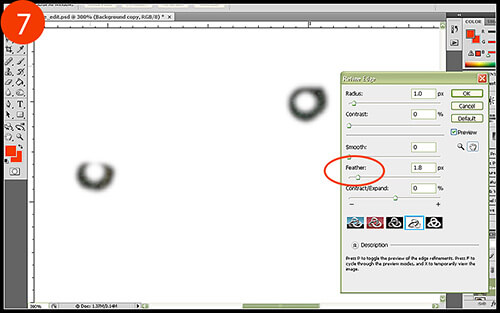
7. To finish the selection, click on the Refine Edge button on your top toolbar and adjust the feathering so that the edges of your selection are gradual and soft. Click OK when finished (Figure 7).
Eye Editing in Photoshop
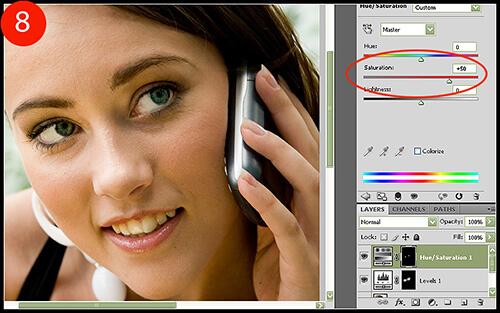
8. Add a new Hue/Saturation adjustment layer, which should automatically provide you with a layer mask that only affects the area we just selected. Increase Saturation to about 50%, or whatever you consider to look natural and vibrant (Figure 8).
Eye Editing in Photoshop
As an optional edit, you can select your Burn tool and with a very soft brush set at an opacity of about 8%, burn the eyeliner and eyelid area slightly to add a smokey eyeshadow effect.
Eye editing is certainly not limited to just red-eye removal, and by using the tools provided in this tutorial, you can be ready for any imperfection the camera decides to throw your way!

Tuesday, December 4, 2012

How to Use Bracketing in Your Photography


How to Use Bracketing in Your Photography

Many people consider bracketing to be an option for advanced photographers only. However, it can be a tool that anyone can make use of in order to create the perfect image. It is not hard to learn how to bracket an image, and once you start using this tool, you will likely find yourself turning to it over and over again.
Would you like to learn more about bracketing and what it can do for your photography?

Just what is Bracketing?

If you have never heard of bracketing before, then your first question may simply be, what is it? This tool gives you more control over the exposure of your image. It actually makes use of three different images of the same subject. In essence, you will take one image at the exposure that you think is correct, an image a step below that exposure and an image a step above that exposure. In this method, you will have a much better chance at getting the absolutely perfect image.
How do you use bracketing? Different cameras have different control options, so you will need to learn about each of them in order to determine which you will need to use with your own digital photography.

The Type of Bracketing

There are different types of bracketing and not all cameras will allow for every single one of them. You will need to learn which of them will be correct for your camera and your digital photography. There are three main types of bracketing that digital SLR cameras will allow:
Exposure Only
Flash Exposure Only
White Balance Only
Some cameras will have different options. For example, the Nikon brand includes something called Active D Lighting feature and Nikon cameras will allow you to bracket this for more detail in the shadows and highlights.
In order to learn how to use bracketing, you will need to experiment with these different types. Flash bracketing can be useful when photographing close subjects so that you can make sure you get an image that is not washed out or too dark. Exposure or white balance bracketing can be useful with all types of images so that you can get the best color, the best contrast and the overall best image.

Bracketing Step By Step

Now that you have a better understanding of how bracketing works, you must be wondering how to put it into action. For a while, you may find bracketing to be a little confusing or overwhelming. However, the more that you use it, the more familiar you will become with it. Once you are completely familiar with bracketing, you will be ready to use it in almost any image that you take. Here are the steps that you will need to take in order to put bracketing to use.
1. Choose the type of bracketing. As mentioned, you may have choices for your digital photography depending on your camera.
2. Choose the number of bracketed exposures that you want. Different cameras give you different choices on this. The Canon brand will give you simply the option of the most popular bracketing of three images. The Nikon brand and some other brands will give you the ability to choose many different bracketing options, including anywhere from 2 frames to 9 frames.
3. Choose the increments for bracketing. If you are trying to fine tune an image, you will want to select a very small bracketing increment. If you want a wide range of choices, then you will want to choose a bracketing increment that is much higher. For minor adjustments, consider choosing 1/3 stop. For major adjustments, you could choose bracketing up to 1 stop. Different cameras will allow for different bracketing increments as well.
4. If you have a Canon DSLR, then you will have the option to set the zero point. This means that your camera will create an image with absolutely the best automatic exposure based on the camera’s own metering system. The zero point will be the image of which all the other images will bracket around.
5. Taking the picture. You have two different choices for taking the picture. You can take the picture in single shot mode. When you do this, you will need to press the shutter release for all of the bracketing images. If you do not want to do this, then you could choose to change your camera to burst shot mode. When you do this, you will be able to hold down the shutter release and take all of the bracketed images in one burst.
6. Reset your camera. When you are done with the bracketing image, you still need to take one more step. That would be to turn bracketing off. Your camera will not turn off the mode automatically and you could end up ruining future images.
Autumn Photography

Autumn Photography

Autumn Photography

Autumn Photography

\Using Bracketing with HDR

As mentioned in another article, your camera will have something called HDR, which is a great help to digital photography. HDR stands for high dynamic range and it simply means that your camera sensors will have a greater range of exposure for even more fine tuned images. In order to make use of bracketing with HDR, you will need a photo editing software like Adobe Photoshop. With this method of bracketing, you will make use of your camera’s full exposure range in order to take several pictures. You will then import the image into the editing software and use the software’s tool to merge. This tool will be called Merge to HDR in Photoshop.
Why would you want to do this? Have you ever noticed that in certain situations, part of the image will be very dark or very light no matter what you do? You can use this type of bracketing to get the right exposure on the light parts and then the right exposure on the dark parts. By combining the two, you will be able to create the perfectly exposed image overall.
Bracketing can truly be a powerful tool once you know how to use it. You will find that you can get better images and better exposures for those images on a regular basis.
Top image by Mike Baird