Master Realistic Eye Editing in Photoshop
Whether your model has that early-morning blur to their eyes or your shooting conditions were less than optimal, almost every portrait could benefit from bit of Photoshop eye assistance. By following these steps, you can achieve clear, vibrant, and piercing eyes all within fifteen minutes of post process work.
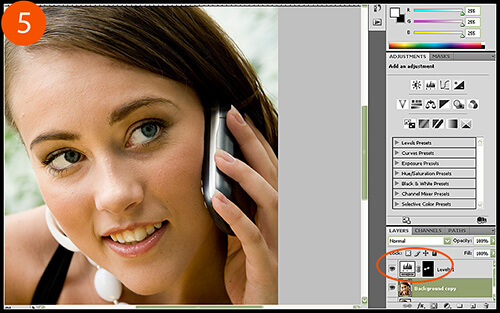
1. Click Layers > Duplicate Layer, then apply a layer mask by clicking on the icon on your layers palette toolbar (Figure 1). Select the Clone Stamp tool, and with a steady hand, clone out any unwanted or distracting reflections (unless you think they add to the portrait in some way). You may need to increase the brush hardness of your clone stamp (right-clicking on the photo will bring up the appropriate menu) when working along sharper edges, such as the pupil or the eyelids. It would also be good to clone out any redness in the whites of the eyes as well.
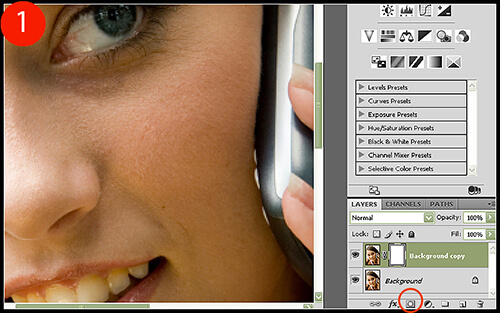
The layer mask is useful in case you over-do it with your cloning: for example, if you clone with too soft of a brush on the whites of the eyes and need to mask in the eyelids a bit.
2. When finished, if you did not use your layer mask, just delete it by right-clicking the mask and selecting Delete Layer Mask.
If you did use it, then you will need to merge down a layer so that our new effects will be applied to a layer with 100% uniform transparency. To do this, click on your base layer and duplicate it. The duplicate layer should appear right beneath the top layer (the one you just masked). Now right-click on the top layer and select Merge Down to combine both layers into one.
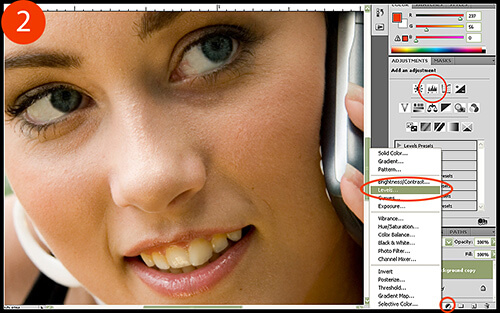
3. Let’s create a new level adjustment layer by clicking on the Levels icon in your Adjustment palette (Figure 2). Alternatively, you can select a Level Adjustment layer from the layers palette toolbar.
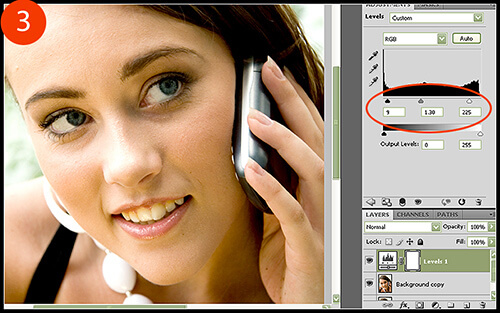
In the Adjustment palette, slide your levels around to lighten the white colors and darken the darker ones. Usually, you will only want to increase the black point triangle by very little since the outlines of the eyelids as well as the pupils are already very dark. However, the white point triangle should be adjusted rather liberally, and the midtone point slider pushed slightly whiter by sliding it to the left. For this example, the black point was reset to 9, midpoint reset to 1.30, and the white point to 225 (Figure 3).
Do not care about what this adjustment does to the entire photo, just focus on the eyes. We will be masking out the level effect on the entire image shortly.
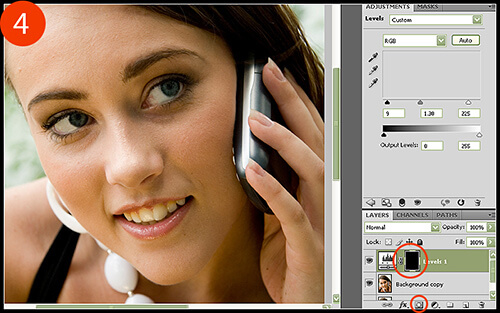
4. Click on the layer mask for the level adjustment layer that was automatically added and delete it by right-clicking and selecting Delete Layer Mask. You can also delete it quickly by clicking on the layer mask and drag-and-dropping it into the trash can located on your layers palette toolbar.
While holding down the ALT key, click on the Add Layer Mask button on your layers palette toolbar to add a black layer mask, which will hide the effect and allow us to only mask in what we choose (Figure 4).
5. Click on your brush tool and set your opacity to 40% and the Master Diameter large enough to cover the entire eye. Make sure your hardness is set to 0% so that we have a very soft brush. In one circular motion, mask in the entire eye AND the entire area around the eye (about one brush width outwards from the eyelids) so that we eliminate some unwanted shadows. With the same brush, this time mask only the eye and eyelids, and finally with a smaller brush, mask just the inner eye area. Our goal is to create a gradual and flattering brightening effect around the eye that increases in intensity as you move towards to the pupil area. The finished result should look something similar to Figure 5.
6. To finish, we are going to liven up the eye color a bit. Click on your base layer (the first layer under the adjustment layer) and then select your Oval Marquee tool, making sure the “add to selection” option is selected from the top toolbar (Figure 6). Select the entire iris area, adding to the small circles you create so that the selection is accurate. When finished, switch to the “subtract from selection” option, located just to the right of the “add to selection” option, and subtract the dark pupil area.

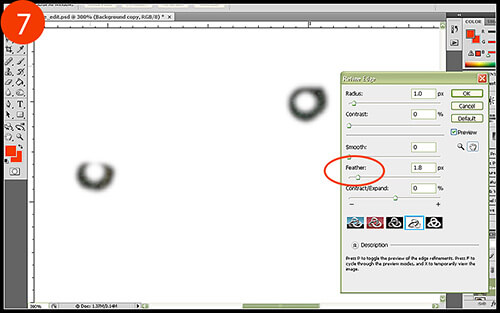
7. To finish the selection, click on the Refine Edge button on your top toolbar and adjust the feathering so that the edges of your selection are gradual and soft. Click OK when finished (Figure 7).
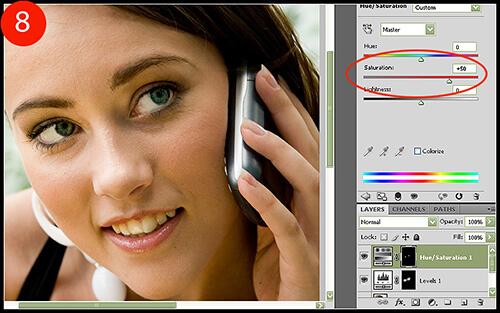
8. Add a new Hue/Saturation adjustment layer, which should automatically provide you with a layer mask that only affects the area we just selected. Increase Saturation to about 50%, or whatever you consider to look natural and vibrant (Figure 8).
As an optional edit, you can select your Burn tool and with a very soft brush set at an opacity of about 8%, burn the eyeliner and eyelid area slightly to add a smokey eyeshadow effect.
Eye editing is certainly not limited to just red-eye removal, and by using the tools provided in this tutorial, you can be ready for any imperfection the camera decides to throw your way!
No comments:
Post a Comment