Tuesday, December 4, 2012

How to Use Bracketing in Your Photography


How to Use Bracketing in Your Photography

Many people consider bracketing to be an option for advanced photographers only. However, it can be a tool that anyone can make use of in order to create the perfect image. It is not hard to learn how to bracket an image, and once you start using this tool, you will likely find yourself turning to it over and over again.
Would you like to learn more about bracketing and what it can do for your photography?

Just what is Bracketing?

If you have never heard of bracketing before, then your first question may simply be, what is it? This tool gives you more control over the exposure of your image. It actually makes use of three different images of the same subject. In essence, you will take one image at the exposure that you think is correct, an image a step below that exposure and an image a step above that exposure. In this method, you will have a much better chance at getting the absolutely perfect image.
How do you use bracketing? Different cameras have different control options, so you will need to learn about each of them in order to determine which you will need to use with your own digital photography.

The Type of Bracketing

There are different types of bracketing and not all cameras will allow for every single one of them. You will need to learn which of them will be correct for your camera and your digital photography. There are three main types of bracketing that digital SLR cameras will allow:
Exposure Only
Flash Exposure Only
White Balance Only
Some cameras will have different options. For example, the Nikon brand includes something called Active D Lighting feature and Nikon cameras will allow you to bracket this for more detail in the shadows and highlights.
In order to learn how to use bracketing, you will need to experiment with these different types. Flash bracketing can be useful when photographing close subjects so that you can make sure you get an image that is not washed out or too dark. Exposure or white balance bracketing can be useful with all types of images so that you can get the best color, the best contrast and the overall best image.

Bracketing Step By Step

Now that you have a better understanding of how bracketing works, you must be wondering how to put it into action. For a while, you may find bracketing to be a little confusing or overwhelming. However, the more that you use it, the more familiar you will become with it. Once you are completely familiar with bracketing, you will be ready to use it in almost any image that you take. Here are the steps that you will need to take in order to put bracketing to use.
1. Choose the type of bracketing. As mentioned, you may have choices for your digital photography depending on your camera.
2. Choose the number of bracketed exposures that you want. Different cameras give you different choices on this. The Canon brand will give you simply the option of the most popular bracketing of three images. The Nikon brand and some other brands will give you the ability to choose many different bracketing options, including anywhere from 2 frames to 9 frames.
3. Choose the increments for bracketing. If you are trying to fine tune an image, you will want to select a very small bracketing increment. If you want a wide range of choices, then you will want to choose a bracketing increment that is much higher. For minor adjustments, consider choosing 1/3 stop. For major adjustments, you could choose bracketing up to 1 stop. Different cameras will allow for different bracketing increments as well.
4. If you have a Canon DSLR, then you will have the option to set the zero point. This means that your camera will create an image with absolutely the best automatic exposure based on the camera’s own metering system. The zero point will be the image of which all the other images will bracket around.
5. Taking the picture. You have two different choices for taking the picture. You can take the picture in single shot mode. When you do this, you will need to press the shutter release for all of the bracketing images. If you do not want to do this, then you could choose to change your camera to burst shot mode. When you do this, you will be able to hold down the shutter release and take all of the bracketed images in one burst.
6. Reset your camera. When you are done with the bracketing image, you still need to take one more step. That would be to turn bracketing off. Your camera will not turn off the mode automatically and you could end up ruining future images.
Autumn Photography

Autumn Photography

Autumn Photography

Autumn Photography

\Using Bracketing with HDR

As mentioned in another article, your camera will have something called HDR, which is a great help to digital photography. HDR stands for high dynamic range and it simply means that your camera sensors will have a greater range of exposure for even more fine tuned images. In order to make use of bracketing with HDR, you will need a photo editing software like Adobe Photoshop. With this method of bracketing, you will make use of your camera’s full exposure range in order to take several pictures. You will then import the image into the editing software and use the software’s tool to merge. This tool will be called Merge to HDR in Photoshop.
Why would you want to do this? Have you ever noticed that in certain situations, part of the image will be very dark or very light no matter what you do? You can use this type of bracketing to get the right exposure on the light parts and then the right exposure on the dark parts. By combining the two, you will be able to create the perfectly exposed image overall.
Bracketing can truly be a powerful tool once you know how to use it. You will find that you can get better images and better exposures for those images on a regular basis.
Top image by Mike Baird

Wednesday, November 14, 2012

how to shoot a beautiful graduation photo


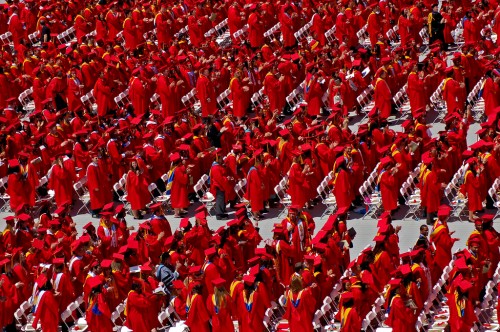
Graduation season again! Wearing graduation gowns moment, also entered a symbol of a new life stage, of course, want to leave an eternal happy memories with loved ones, you ready photographed beautiful moments? Let us introduce the elements of graduation photography it!

Hardware equipment

Since the friendly family and friends come to celebrate, the group photo is of course essential. The shooting group photo suggestions with tripod and wide-angle lens , in order that all included in the King, anti-shake, and photographed the gate / Department of the door plaque. The permit with teleconverter head to take close-up images (such as the moment of the ceremony, award certificates), to capture the best look. If shooting with a long mirror graduation ceremony, consider using a monopod toincrease stability, reduce hand tremors opportunity I can to maintain a certain degree of mobility.

Camera settings

Shoot a group photo, the best aperture settings F5.6 or impact by the depth of field in order to avoid the portrait subject; shutter set to slightly higher than the safety shuttercoefficient, in order to reduce tremor and photographed failure photo; picture quality Please consider Raw (if only two a choice, it is recommended to use the RAW) and JPEG simultaneously, so you can quickly back to browse while camera for partial repair, can also be raised in post-production photo tolerance. Need to set the flashing lights , please photometric amount transferred weak, more use of the available light. Such as a wide-angle lens to shoot a group photo, to pay attention to the problem of lens distortion, such as the lens is 24-70mm, wide angle to shoot as much as possible not to use the left and right sides will be stretched because the lens becomes. Similarly metering should pay special attention to the camera's metering might think, mostly black graduation gown, dark environment and lengthened exposure time, so that the person's face appears overexposed, shooting a close-up of the most common problems, then you can the use of the camera's spot metering measured position of a face to resolve the problem of exposure.
By {link: http://www.flickr.com/photos/mane62/2521382091/sizes/l/} Manaf {/ link}
By Manaf

Shooting graduation phase techniques

Some graduation photo can not be missing scenes and posture in this column points for reference:
The campus door / classroom building / group photo
By {link: http://www.flickr.com/photos/ynysforgan_jack/3912802217/sizes/l/in/photostream/} ybysforgan_jack {/ link}
The wide-angle lens + from waist height up shooting By ybysforgan_jack
Award certificates moment
By {link: http://www.fotop.net/richardkwan/richardkwan101/DSC_0903_a} Richard Kwan {/ link}
High shutter + aperture + level shooting By Richard Kwan
Throwing Quartet cap
By {link: http://www.flickr.com/photos/badgopher/2524936826/sizes/l/} Jarnott {/ link}
High-speed shutter (at least 1/250 or faster) + inhibition Photo / down shooting By Jarnott from a height

Site selection

In addition to the the general friend more than a campus-wide shooting graduation photo, Hong Kong Park, Tai Po Waterfront Park , Cyberport or Disney are shooting a popular place for graduation photo, if you have other memorable places (such as dormitories, stations, etc.), Of course, also can be used to take the picture. Please pay attention to more graduation photos for group photo, good routes and timing, pre-designed or pre-line time and avoid wasting time on the same day in the real-time trip planning.
Graduation is an important life events, but the shooting of graduates is not difficult to imagine, as long as the individual shooting skills with the scene changes done enough preparation in advance, you can capture beautiful graduation photo! Finally, I hope that you can quickly master the above skills, photographed a series of beautiful graduation photo series for family and friends!

Wednesday, June 20, 2012

The secret to joint pain relief — exercise

The secret to joint pain relief — exercise

Joint pain: it throbs, aches, and hurts. Quite likely, it makes you think twice about everyday tasks and pleasures like going for a brisk walk, lifting your grandchild or some grocery bags, chasing a tennis ball across the court, or driving a golf ball down the fairway. Sharp reminders of your limitations arrive thick and fast, practically every time you move.

What causes joint pain?
Very often, the culprits behind joint pain are
  • osteoarthritis
  • old injuries
  • repetitive or overly forceful movements during sports or work
  • posture problems
  • aging
  • inactivity
How exercise can help
Ignoring the pain won’t make it go away. Nor will avoiding all motions that spark discomfort. In fact, limiting your movements can weaken muscles, compounding joint trouble, and affect your posture, setting off a cascade of further problems. And while pain relievers and cold or hot packs may offer quick relief, fixes like these are merely temporary.
By contrast, the right set of exercises can be a long-lasting way to tame ankle, knee, hip, or shoulder pain. Practiced regularly, joint pain relief workouts might permit you to postpone — or even avoid — surgery on a problem joint that has been worsening for years by strengthening key supportive muscles and restoring flexibility. Over time, you may find limitations you’ve learned to work around will begin to ease. Tasks and opportunities for fun that have been weeded out of your repertoire by necessity may come back into reach, too.
Beyond the benefits to your joints, becoming more active can help you stay independent long into your later years. Regular activity is good for your heart and sharpens the mind. It nudges blood pressure down and morale up, eases stress, and shaves off unwanted pounds. Perhaps most importantly, it lessens your risk of dying prematurely. All of this can be achieved at a comfortable pace and very low cost in money or time.


Why weight matters


Being overweight raises your risk for developing osteoarthritis in a weight-bearing joint like the knee — and even in the hand, according to some research, since inflammatory factors related to weight might exacerbate this condition. Simply walking across level ground puts up to one-and-a-half times your body weight on your knees. That means a 200-pound man will deliver 300 pounds of pressure to his knee with each step. Off level ground, the news is worse: each knee bears two to three times your body weight when you go up and down stairs, and four to five times your body weight when you squat to tie a shoelace or pick up an item you dropped.
Fortunately, strengthening your quadriceps (the muscles on the fronts of the thighs) changes the equation, and so does losing weight. Each pound you lose reduces knee pressure in every step you take. One study found that the risk of developing osteoarthritis dropped 50% with each 11-pound weight loss among younger obese women. If older men lost enough weight to shift from an obese classification to just overweight — that is, from a body mass index (BMI) of 30 or higher down to one that fell between 25 and 29.9 — the researchers estimated knee osteoarthritis would decrease by a fifth. For older women, that shift would cut knee osteoarthritis by a third.

Artificial Sweeteners

NaturalNews) Scientists from Brigham and Women's Hospital in Boston have revealed results from a study outlining some of the effects of artificial sweeteners on the body. Conducted on a group of 3,000 women, the results indicated that those who drank two or more artificially-sweetened beverages a day doubled their risk of more-rapid-than-normal kidney function decline.

The study accounted for various other risk factors including the woman's age, her blood pressure, if she smoked, and if she had any other pre-existing conditions such as heart disease or diabetes. The 11-year study evaluated the effects of all sweetened drinks on progressive kidney decline and discovered that two or more diet drinks leads to a two-fold increase in rapid kidney decline incidences.

Though study results did not show any correlation between sugar- or corn syrup-sweetened drinks and the onset of rapid kidney decline, these ingredients are implicated in causing diabetes and obesity and should not be perceived as safe merely because they did not have a direct correlation in this particular study topic.

High sodium intake was also implicated in the study as promoting progressive kidney decline. Since diet soda contains excessive amounts of sodium, higher than sugar soda, it is no surprise that diet sodas were the primary offenders in the study. However it is unclear from this particular study which ingredient plays the larger role in progressive kidney decline, the artificial sweeteners or the sodium content.

Studies on aspartame

When aspartame was first approved in the 1970s under the name "NutraSweet", studies were submitted as supposed proof that the artificial chemical was safe. The FDA initially approved the chemical in 1974 for use in a limited number of foods based upon the studies submitted by G.D. Searle Co., the company that invented aspartame.

Following a discovery made shortly thereafter by a research psychiatrist who found that aspartic acid, a primary ingredient in aspartame, caused holes to form in the brains of mice, the FDA decided to form its own internal task force to investigate the initial claims made by the Searle Co.

What the agency discovered was a series of falsified claims, compromised study results, and missing information. The claims made in favor of aspartame were so dubious and the evidence so faulty that the FDA decreed that a grand jury should investigate Searle Co.'s claims. Unfortunately, the case failed to move forward when U.S. Attorney Thomas Sullivan and Assistant U.S. Attorney William Conlon failed to initiate any legal action. Conlon was later hired by the law firm that represented Searle Co.

Investigation revealed that aspartame had caused tumors, seizures, brain holes, and death in many of the studies. All negative findings had been altered or scrubbed from the final reports delivered to the FDA when aspartame was first reviewed.

Time and time again the question over whether aspartame is safe has led to investigations that never go anywhere. Studies are continually released in support of the chemical's safety even though they fail to address the results of other studies that show it to be harmful.

Other artificial sweeteners

A study published in the January, 2008 issue of the Journal of Toxicology and Environmental Health revealed that the newer artificial sweetener, sucralose, alters gut microflora and inhibits the assimilation of dietary nutrients.

Commonly marketed as being "made from sugar", sucralose had undergone no long-term human studies to verify its safety in humans. Like aspartame, initial studies revealed negative reactions by lab animals on whom it was tested, indicating that there could be the same potential problems in humans.

The EU Food Commission, Canadian health officials, and the U.S. FDA all rejected the initial studies submitted by McNeil Nutritionals, the marketers of sucralose, because of the negative results. However they encouraged the company to continue researching until they "got it right". McNeil simply lowered the levels of sucralose used in their studies until an acceptable limit was found. After several tries, sucralose was finally approved.

Stevia, a safe alternative

A great many varieties of artificial sweeteners have been approved, many scandalously, despite the fact that safe, natural alternatives exist. Stevia, for instance, is a sweet herb from South America that is up to 300 times sweeter than sugar. Claiming inadequate safety research, the FDA has long refused the herb from being included on the "generally recognized as safe" (GRAS) list.

Up until last year, all forms of stevia could only be sold as dietary supplements. The extract could not be labeled as a "sweetener" and it could not be included in any food items.

Once the parent companies of both Pepsi and Coca-Cola discovered how to manipulate and patent a segment of stevia, however, it suddenly became safe to use as a sweetener and is now sold on grocery store shelves in packets similar to the artificial sweeteners. The FDA reluctantly added the natural stevia extract to the GRAS list as well.

Stick with natural and unprocessed
When it comes to health, a person's best bet is to avoid artificial sweeteners altogether. There are plenty of preferable, safe alternatives such as stevia which will allow for a little extra sweetness without all the harmful side effects.

Sources for this story include

http://www.dailymail.co.uk/health/a...

http://www.upi.com/Health_News/2009...

http://www.holisticmed.com/aspartame/

http://www.informaworld.com/smpp/co...

What juice will clean my colon of old fecal matter?


Believe it or not, but the best juice to cleanse your colon is water!

When it comes to vegetables, the best vegetables to juice to clean your colon are those that have a yin or cooling ability. Constipation indicates your body is too hot. Let me explain ...

First, to be honest, many people have more than 10 lbs of caked fecal matter. John Wayne had something like 40 pounds and Elvis Presley had about the same, if I remember correct. In fact, Elvis died sitting on the toilet. He had so much compacted fecal matter that he literally gave himself a heart attack trying to force a bowel movement. Elvis isn't the only person who has done this... may others have had the same problem.

You don't need expensive bowel cleansing programs. You just need to apply some common sense in combination with the taking advantage of ancient wisdom.

First, you need to look at lifestyle. You need to eliminate as many processed foods as you can. These foods have no fiber and get stuck in the body.

Second, realize the bowels need moisture to work properly. You can have all the fiber in the world, but if you don't have moisture in the bowels, then the fiber can't do very much. So you need to make sure you are drinking lots of water ... juice, tea, coffee, sodas, etc all do not constitute as water ... you need water and water by itself.

Although tea has water in it, once you turn it into tea, the constitution has changed and the body no longer recognizes the tea as water. This same rule applies to juice, sodas, etc.

Third, foods that are high in yang (hot) energy will naturally burn the moisture from the body. So even if you are drink lots of water, if you have too much yang energy, then the water is burned up by the yang energy. Foods that are high in yang energy include but are not limited to deep fried foods, BBQ / grilled foods, alcohol and other foods like green peppersgarlicginger, spicy foods, etc.

Taking all of this into account. What you need is to ensure you are drinking lots of water, getting sufficient fiber by eating whole foods and/or even taking a fiber supplement... not eating too many yang foods while having foods that are slightly more yin (cooling) so the moisture stays in the bowels. But if you have too much yin energy then instead of constipation, you will have loose bowel movements and even bowel movements that appear diarrhea like in nature.

Licorice tea is excellent for helping to bring moisture to the bowels. Additionally, the yogis of India say that licorice creates a scent that attracts women (possibly another bonus!).

More than juice, what you need to do is think of some foods to eat to help cleanse the bowels. Apples,melons and papaya are some fruits that come to mind to help cleanse the bowels. Papaya is a great cleanser but I wouldn't have it all the time because papaya can also create too much dampness in the body.

Drink green tea instead of coffee... green tea has a slight cooling effect on the body whereas coffee is a factor in constipation.

Eat vegetables like carrotscorn, squash, bamboo shoots and definitely eat some zucchini (or any squash for that matter)... one of the best natural cleansers is zucchini though. Beets also do good too. Beets can really help to purge the bowels of old fecal matter but don't be surprised if your bowel movements or urine turn red after eating beets. But I would focus less on juicing and more on the foods you eat because that way you get fiber too.

Sure, the vegetables you juice will have an impact, but it's diet and lifestyle that will have the biggest impact on constipation, cleaning and preventing fecal matter from compacting within the colon.

You will know when your body has enough moisture in the bowels and fiber because the bowels movements will be relatively easy and the actual bowel movement itself will create a coil like shape.

Eliminate those hot (yang) foods, incorporate some cooling foods... and eat some whole grains such as brown rice.

Also, it's worth noting that cold drinks and cold foods can lead to constipation.

Believe it or not, but cold drinks and foods make your body hot. Thus burning up moisture in the body. The reason why is because when you have something cold, while it may be refreshing to your mouth, as soon as it lands in your stomach, your stomach needs to warm the food or drink.

To do this, the body pushes lots blood to your stomach. Of course, this then robs other parts of your body of blood. But it also robs your body of moisture. Cold foods and drinks should be avoided.

Please also remember that the colon is a muscle. When you have old fecal matter stuck in your colon, it becomes like cement along your colon wall. It prevents the colon muscle from squeezing. In turn, this contributes to a lazy (weak) colon which in turn makes the constipation issue worse.

So we want to ensure we are drinking enough water because that's what really begins to allow the old fecal matter to be removed. It's not a quick process to clean out the colon, but it is not a difficult thing to do either.

Constipation is more of a lifestyle issue ... juice has an impact, but if you fail to fix the lifestyle, the constipation will just continue. Just make some of the minor changes / adjustments above and I am sure you will notice a huge difference.

One last thought, try to get to sleep early ...  around 10 PM is good ... 11 PM is acceptable, but any time you go to sleep after midnight, you make your body hot by stressing the hormones and adrenal glands ... meaning you burn more moisture in the body.

Ultimately, become aware of the visible and hidden factors that lead to constipation.

Colon cancer is one of the easiest cancers to prevent!


When your fecal matter becomes a stubborn layer of mucus plaque, water is not strong enough to remove it. You need to detoxify it with Magnesium oxide.

the right way to cook instant noodle

The correct way to cook instant noodles without harming our bodies and health: Normally, how we cook the instant noodles is to put the noodles into a pot with water, throw in the powder and let it cook for around 3 minutes and then it's ready to eat.

This is the 
WRONG method of cooking the instant noodles.

By doing this, when we actually boil the ingredients in the powder,normally with MSG, it will change the molecular structure of the MSG, causing it to be toxic.

The other thing that you may or may not realize is that, the noodles are coated with wax and it will take around 4 to 5 days for the body to excrete the wax after you have eaten the noodles.


CORRECT METHOD:
 
1. Boil the noodles in a pot of water.

2. Once the noodles are cooked, take out the noodles, and throw away the water which contains wax.

3. Boil another pot of water, add the cooked noodles into the hot boiling water and then turn off the stove.

4. Only at this stage when the stove is off, and while the water is very hot, add the flavouring powder into the water, to make noodle soup.

5. However, if you need dry noodles, remove the noodles and add the flavouring powder and toss it to get dry noodles.


Dietician's Note: 


If you buy plain hakka noodles which you make, you initially need to boil in water and discard the water. This will soften the noodles but to prevent it from sticking we need to add a tbsp of oil and also the noodles are deep fried partially to make them crunchy and then dusted with flour to prevent them from sticking while boiling. Hence when you buy the noodles they are already made unhealthy and this is the type we use to make stir fry noodles and the regular Maggie too is made the same way, plus they add MSG / Ajinomoto and other chemical preservetives.


A large number of patients with ages ranging from 
18-24
 
years
 
 are ending up with pancreatitis either as 
 
a swelling or infection
 
 of the pancreas 
 
due to regular consumption of instant noodles...

 
If the frequency is more than 3 times a week, then it is very hazardous... 

Friday, May 25, 2012

Posing Guide: 21 Sample Poses to Get You Started with Photographing Couples


Posing Guide: 21 Sample Poses to Get You Started with Photographing Couples
by Kaspars Grinvalds from Posing App.

In the previous articles in this posing guide series we looked individually at posing female subjectsposing male subjects and posing children. In those individual person portraits the main subject was a single person and her or his personality. In comparison, couple photography is more about connection, interaction and above all – feelings between two people. And most probably those are very deep and passionate feelings, which makes couple photography so delightful and positive.
Generally a couple should be easy to engage in a photo shoot. If they are initially a bit shy or feeling uncomfortable, just ask them to show you how they felt and looked when they met for the first time. You will invoke them on an emotional level, providing you with natural and loving expressions in their portraits

1. Easy starting pose standing face to face (but looking to the camera) and her holding an arm on his chest. Take both close-up as well as vertical shots.
couple01.gif

2. Ask the couple to stand very close to each other to catch intimate close-up portraits. Don’t be afraid to zoom in and crop real tight!
couple02.gif

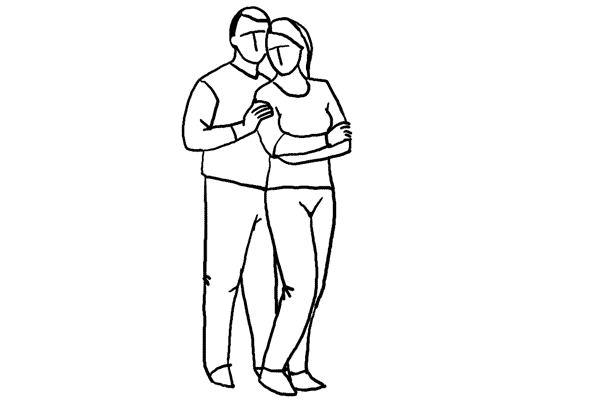
3. Very easy and cordial pose with him holding her from behind. The couple may look straight into the camera or at each other. They might even kiss for a more emotive shot.
couple03.gif


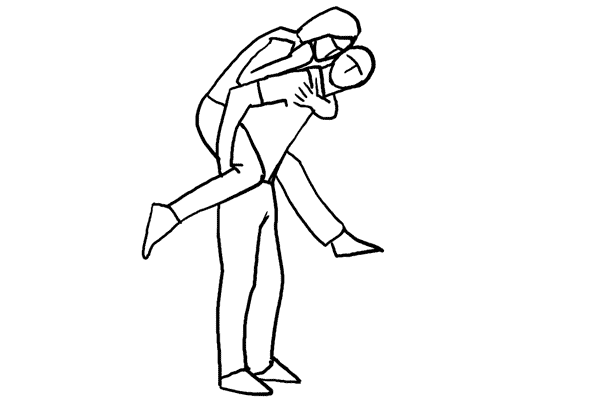
4. Fun and loving pose with her holding onto his back and shoulders. Pay attention to hand positioning: It should be simple and natural.
couple04.gif


5. Just a variant with her holding him from behind. Remember that the couple doesn’t necessarily have to look in the camera. For better results, make them interact with each other by talking, flirtatious looks, laughing etc.
couple05.gif


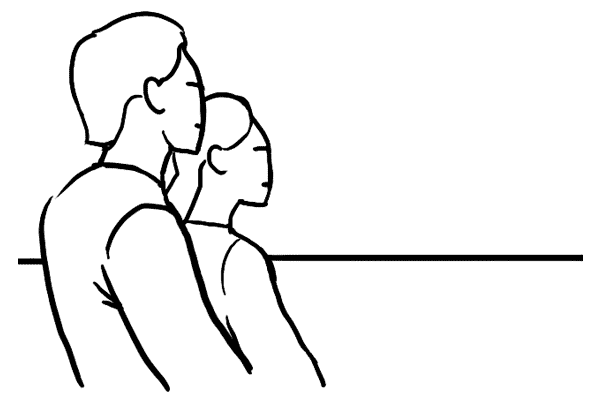
6. Creates a very romantic mood. Works best outdoors with some open space in the background. Shoot only slightly from a back. Remember that you have to be far enough to the couples side to be able to capture each person’s closest eye, otherwise you will create an impersonal, “empty” shot.
couple06.gif


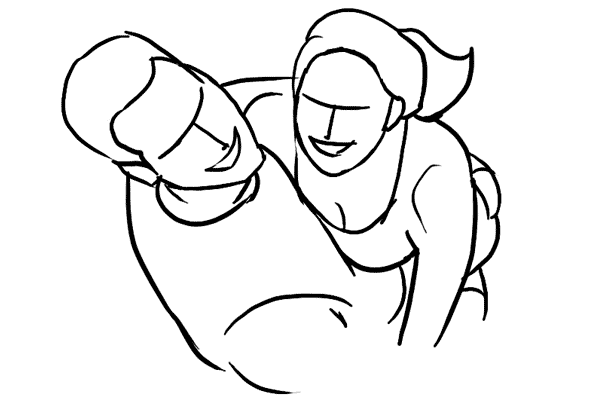
7. Find some elevation and shoot your subjects from above. A common pose shot from an unusual angle is always creative and will often reward you with surprisingly good results.
couple07.gif


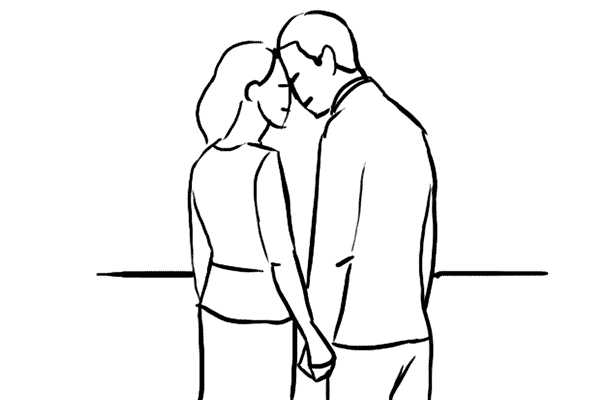
8. Another romantic pose. Works best outdoors with some open space in the background. Works also very well as a silhouette against a bright background, in front of a sunset, for example.
couple08.gif


9. Easy to realize pose for a full height shot. Creates a calm and affectionate mood.
couple09.gif


10. A fun pose. Don’t presume this to be appropriate only with younger people. If an older couple feels fine with it, this pose will work absolutely superb with them as well. Try different framings, take full height shots, half height ones and close-ups.
couple10.gif


11. Very nice way to show the affection when meeting each other. Works very well in crowded places, such as a famous meeting point in a city, trains or metro stations etc.
couple11.gif


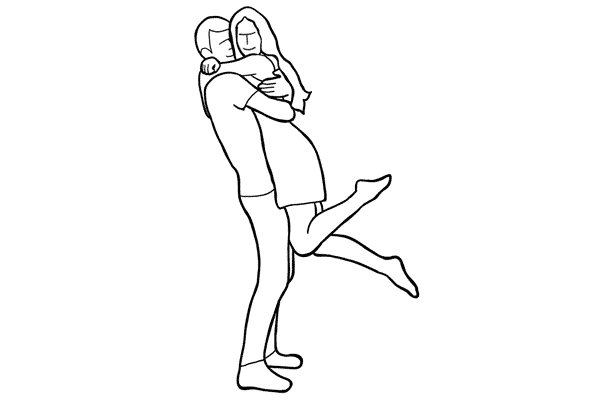
12. A pose with a little bit of fun. The crucial part is her leg positioning, each leg should be bent in different angles. While he is still lifting her, take a close-up portrait shot as well.
couple12.gif


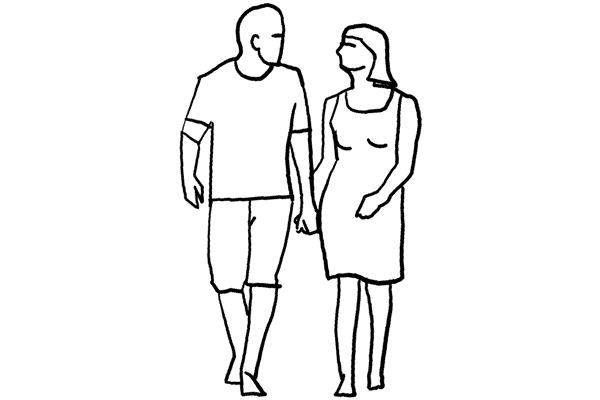
13. Take shots of the couple walking hand in hand approaching from a distance. Shoot in burst mode only! However, the majority of your shots will look awkward because of the leg movement. Therefore, the second part of your job is to select the photos with the best leg movement and positioning afterwards.
couple13.gif


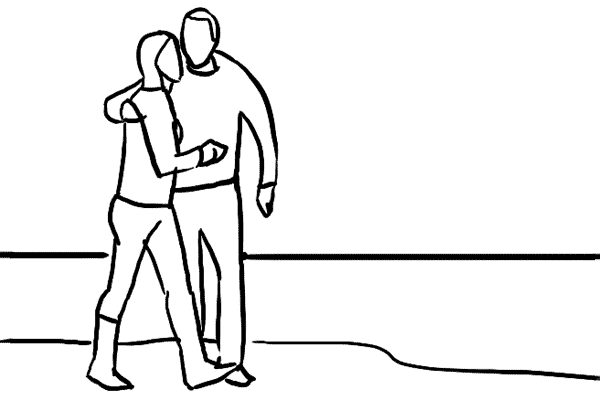
14. Another variant with a walking couple. This time couple walks close together and holds onto each other. Again, take several shots and choose those with the most elegant leg positioning.
couple14.gif

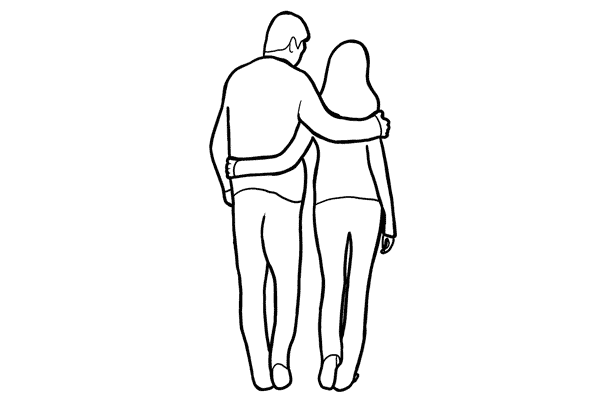
15. Never forget that there often are good opportunities simply shooting from the back.
couple15.gif


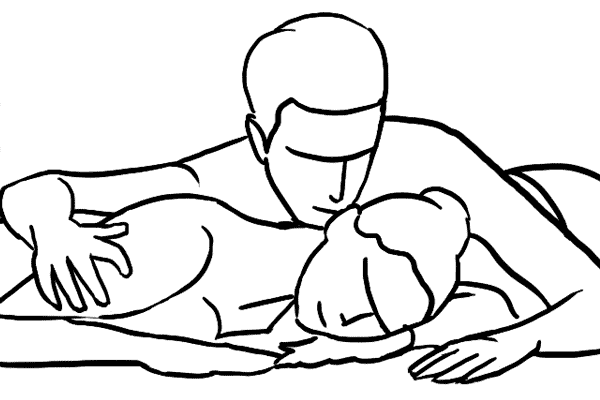
16. A couple lying close together on the ground. Make them lift their upper bodies a bit by using their arms as supports. He might embrace her gently. Shoot from a very low angle.
couple16.gif

17. Another variant with a couple lying on the ground. This time with a little interspace.
couple17.gif


18. A good example to show that two persons can very well be positioned asymmetrically.
couple18.gif


19. Informal and fun way to pose for a couple lying on their backs.
couple19.gif


20. A cordial pose, ask the couple to sit comfortably on their favorite sofa.
couple20.gif


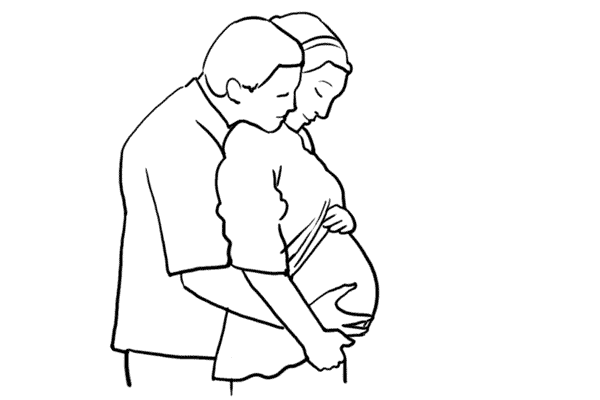
21. Sometimes shooting a couple may mean maternity photography. Some poses from this couples series work also pretty well for such an occasion. Simply adjust a posing accordingly to show the couple’s feelings about and interactions with the unborn new life.
couple21.gif


Allow me to repeat the previously stated – look at these sample poses as a starting point only. That’s the reason why they are rough sketches instead of real photos. You can’t and should not repeat the pose exactly, instead adjust the pose creatively according to your shooting environment and scenario.